纸上得来终觉浅,绝知此事要躬行。

程序写着写着就会变得越来越大,怎么能够更好的组织代码,就是我们应该关注的重点。而正确的做法,就是将程序分解成多个较小的方法,一般分为函数、对象、模块三种。
1. 函数
函数是带名称的代码块,可以将逻辑封装起来,多次使用。
- 函数格式
def <name>(arg1, arg2, ..., argN):
    <statements>
    return <value>
- 函数定义
# 没有参数的函数定义
In [1]: def hello():
   ...:     print('Hello World!')
   ...:     return True
   ...:

In [2]: hello()
Hello World!
Out[2]: True
# 有参数的函数定义
In [3]: def hello(name='World!'):
   ...:     print(f'Hello, {name}')
   ...:

In [4]: hello()
Hello, World!

In [5]: hello('Escape')
Hello, Escape
1.1 函数中的参数
函数参数
- 形参:形参是指函数定义中在内部使用的参数,这个函数完成其工作所需要的信息内容,在没有实际调用的时候函数用形参来指代
- 实参:实参是指调用函数时由调用者传入的参数,这个时候形参纸袋的内容就是实参内容
实参类型
- 位置参数(
positional argument) - 关键字参数(
keyword argument)
- 位置参数(
# 位置参数

# [方式一] 以值的形式传递
In [8]: def hello(name):
   ...:     print(f'Hello, {name}!')
   ...:

In [9]: hello('Escape')
Hello, Escape

# [方式二] 以*开头的元组传递,即变长位置参数
In [10]: def hello(*names):
    ...:     print(names)
    ...:

In [11]: hello('Escape')
('Escape',)
# 关键字参数

# [方式一] 以名称等于值的形式传递
In [16]: def hello(name='World'):
    ...:     print(f'Hello, {name}!')
    ...:

In [17]: hello()
Hello, World!

In [18]: hello('Escape')
Hello, Escape!

# [方式二] 以两个*开头的字典传递,即变长关键字参数
In [21]: def hello(prefix, name='World', **kwargs):
    ...:     print(f'{prefix} {name}! {kwargs}')
    ...:

In [22]: hello('Hello')
Hello World! {}

In [23]: hello('Hello', name='Escape')
Hello Escape! {}

In [24]: hello('Hello', name='Escape', say='hahaha...')
Hello Escape! {'say': 'hahaha...'}
# 强制关键字参数
# 这是在Python3.6当中新引入的,强制让*之后使用关键字参数传递
In [13]: def powerkw(maxsize, *, block):
    ...:     pass
    ...:

In [14]: powerkw(1000, block=True)

In [15]: powerkw(1000, True)
---------------------------
TypeError                                 Traceback (most recent call last)
<ipython-input-15-ef44e44233b2> in <module>()
----> 1 powerkw(1000, True)
TypeError: powerkw() takes 1 positional argument but 2 were given
- 混合使用
- 顺序:常规参数、默认参数、变长元组参数、变长关键字参数
- 注意:位置参数必须在关键字参数之前出现
In [25]: def func(a, b=0, *args, **kwargs):
    ...:     print('a =', a, 'b =', b, 'args =', args, 'kwargs =', kwargs)
    ...:

In [26]: func(1, 2)
a = 1 b = 2 args = () kwargs = {}

In [27]: func(1, 2, d=4)
a = 1 b = 2 args = () kwargs = {'d': 4}

In [28]: func(1, 2, 3)
a = 1 b = 2 args = (3,) kwargs = {}

In [29]: func(1, 2, 3, d=4)
a = 1 b = 2 args = (3,) kwargs = {'d': 4}
1.2 函数中的返回值
In [30]: def add(a, b):
    ...:     return a + b
    ...:

In [31]: add(1, 2)
Out[31]: 3

In [32]: def partition(string, sep):
    ...:     return string.partition(sep)
    ...:

In [33]: partition('/home/escape/bran', '/')
Out[33]: ('', '/', 'home/escape/bran')
1.3 函数中的作用域
变量作用域(BGEL):从上往下级别依次递增
- (B) 系统变量
- (G) 全局变量
- (E) 嵌套作用域
- (L) 本地作用域
- 系统变量
- 解释器自行定义的系统变量集合
# 在Python3中引入builtins不需要使用双下划线
In [44]: import builtins

In [45]: ', '.join((i for i in dir(builtins) if i.islower() and '_' not in i))
Out[45]: 'abs, all, any, ascii, bin, bool, bytearray, bytes, callable, chr,
classmethod, compile, complex, copyright, credits, delattr, dict, dir, display,
divmod, enumerate, eval, exec, filter, float, format, frozenset, getattr,
globals, hasattr, hash, help, hex, id, input, int, isinstance, issubclass,
iter, len, license, list, locals, map, max, memoryview, min, next, object,
oct, open, ord, pow, print, property, range, repr, reversed, round, set,
setattr, slice, sorted, staticmethod, str, sum, super, tuple, type, vars, zip'

# 在Python2需要使用双下划线,但Python3不需要导入就能使用
>>> import __builtin__
>>>> dir(__builtin__)
...
- 全局变量
- 如果全局有定义,而在局部没有定义,就会使用全局变量
- 如果局部要定义,定义前不要使用这个变量,否则要引入
global或nonlocal关键字声明
# 全局变量
In [38]: g = 0

In [39]: def run():
    ...:     print(g)
    ...:

In [40]: run()
0

In [41]:

In [41]: def run():
    ...:     g = 2
    ...:

In [42]: run()

In [43]: g
Out[43]: 0
# [全局变量的常见错误一]
# 报错信息提示本地变量g没有被定义就使用了,这是因为在函数体内定义了和全局变量同名的局部变量,
# 不管全局内是否定义了此变量的值,函数体内只是用局部变量的值
In [56]: g = 0

In [57]: def run():
    ...:     print(g)
    ...:     g = 2
    ...:     print(g)
    ...:

In [58]: run()
---------------------------
UnboundLocalError                         Traceback (most recent call last)
<ipython-input-58-ec9775ede022> in <module>()
----> 1 run()

<ipython-input-57-70ad5c1b5edb> in run()
      1 def run():
----> 2     print(g)
      3     g = 2
      4     print(g)
      5

UnboundLocalError: local variable 'g' referenced before assignment


# [全局变量的常见错误二]
# 报错信息提示本地变量g没有被定义就使用了,这是因为在函数体内定义了和全局变量同名的局部变量,
# 不管全局内是否定义了此变量的值,函数体内只是用局部变量的值
In [59]: g = 0

In [60]: def run():
    ...:     g += 2
    ...:     print(g)
    ...:

In [61]: run()
---------------------------
UnboundLocalError                         Traceback (most recent call last)
<ipython-input-61-ec9775ede022> in <module>()
----> 1 run()

<ipython-input-60-2eed38be07b2> in run()
      1 def run():
----> 2     g += 2
      3     print(g)
      4

UnboundLocalError: local variable 'g' referenced before assignment


# [解决方式] global关键字
# 不推荐使用,如果没有使用的话很可能是因为程序设计不合理导致的
In [62]: def run():
    ...:     global g
    ...:     g += 2
    ...:     print(g)
    ...:

In [63]: run()
2
- 嵌套作用域
- 嵌套作用域和本地作用域是相对的,嵌套作用域的变量相对于上层来说也是本地变量
# run2就是闭包了
In [48]: g = 0

In [49]: def run():
    ...:     g = 2
    ...:     def run2():
    ...:         print(g)
    ...:     return run2
    ...:

In [50]: run()()
2
- 本地变量
- 函数体内定义的变量
# 本地变量
In [36]: def run(name):
    ...:     s = f'{name}'
    ...:     for x in range(5):
    ...:         if x == 3:
    ...:             return
    ...:     print(s)
    ...:

In [37]: run('Escape')
1.4 函数中的闭包
闭包:指延伸了作用域的函数,其中包含函数定义体中的引用,但是不在定义体中定义的非全局变量,它能访问定义体之外定义的非全局变量
- 闭包:嵌套作用域
# maker就是工厂函数,action就是闭包
In [51]: def maker(n):
    ...:     def action(m):
    ...:         return n * m
    ...:     return action
    ...:

In [52]: f = maker(3)

In [53]: f(2)
Out[53]: 6

In [54]: g = maker(10)

In [55]: g(2)
Out[55]: 20
- 修改嵌套作用域变量:
nonlocal- 赋值的变量名,如不使用
global或nonlocal声明为全局变量或非本地变量,均为本地变量 - 需要注意的是,这里的
nonlocal声明只改变定义体上一层的变量的值
- 赋值的变量名,如不使用
In [63]: def run():
    ...:     g = 2
    ...:     def run2():
    ...:         g = 4
    ...:         print(f'inner: {g}')
    ...:     run2()
    ...:     print(f'outer: {g}')
    ...:

In [64]: run()
inner: 4
outer: 2
In [65]: def run():
    ...:     g = 2
    ...:     def run2():
    ...:         nonlocal g
    ...:         g = 4
    ...:         print(f'inner: {g}')
    ...:     run2()
    ...:     print(f'outer: {g}')
    ...:

In [66]: run()
inner: 4
outer: 4
1.5 函数中的高阶函数
- 参数为函数
- 函数中的参数为另一个函数的方法,可以成为高阶函数
In [33]: def hello(name):
    ...:     print(f'Hello {name}!')
    ...:

In [34]: def test(func, name='World'):
    ...:     func(name)
    ...:

In [35]: test(hello, 'Escape')
Hello Escape!
- 匿名函数
In [67]: f = lambda n: n * 2

In [68]: f(10)
Out[68]: 20
In :def double(n):
...:     return n * 2...:

In : list(map(double, l1))
Out: [2, 6, 8]

In : list(map(lambda x: x * 2, l1))
Out: [2, 6, 8]

In : l = [[2, 4], [1, 1], [9, 3]]
In : sorted(l)
Out: [[1, 1], [2, 4], [9, 3]]

# 匿名函数中使用对象第二项进行排序
In : sorted(l, key=lambda x: x[1])
Out: [[1, 1], [9, 3], [2, 4]]

# 匿名函数中使用对象的属性
In : l3 = ['/boot/grub', '/usr/local', '/home/escape']
In : sorted(l3, key=lambda x: x.rsplit('/')[2])
Out: ['/home/escape', '/boot/grub', '/usr/local']
- 高阶函数:map
- 对可迭代对象的每一个元素进行计算
In : rs = map(double, l1)

In : rs
Out: <map at0x105986748>

In : list(rs)
Out: [2, 6, 8]
- 高阶函数:filter
- 筛选出值为
True的值,其余则将筛除
- 筛选出值为
In : def is_odd(x):
...:    return x % 2 == 1
...:

In : rs = filter(is_odd, l1)
In : rsOut: <filter at0x105986d68>

In : list(rs)
Out: [1, 3]

In : list(filter(None, [1, '', {}, (), False, None, set()]))
Out: [1]
- 高阶函数:reduce
- 对可迭代对象的值俩俩重复进行计算
# 函数必须接收两个参数
In : def add(a, b):
...:     return a + b
...:

# 在Python3中需要额外导入
In : from functools import reduce
In : reduce(add, [1, 2, 3])
Out: 6

# 第三个参数表示计算的初始值
In : reduce(add, [1, 2, 3], 10)
Out: 16
1.6 函数中的常见函数
- 常见函数:zip
In [69]: a = list(range(1, 4))

In [70]: b = list(range(4, 7))

In [71]: c = list(range(7, 11))

In [72]: zip(a, b)
Out[72]: <zip at 0x10d0beb08>

In [73]: list(zip(a, b))
Out[73]: [(1, 4), (2, 5), (3, 6)]

In [74]: list(zip(a, c))
Out[74]: [(1, 7), (2, 8), (3, 9)]

In [75]: list(zip(*zip(a, b)))
Out[75]: [(1, 2, 3), (4, 5, 6)]
- 常见函数:sum
# 求和
In [76]: sum([1, 2, 3])
Out[76]: 6

# 设定初始值
In [77]: sum([1, 2, 3], 10)
Out[77]: 16

# 可以把嵌套的数据扁平化
In [78]: sum([[1, 2], [3, 4]], [])
Out[78]: [1, 2, 3, 4]
1.7 函数中的开发陷阱
- 开发陷阱:可变默认参数
- 当默认参数时可变对象的时候,其实每次更改的都是同一个变量
# [开发陷阱]
In [79]: def append_list(ele, to=[]):
    ...:     to.append(ele)
    ...:     return to
    ...:

In [80]: append_list(1)
Out[80]: [1]

In [81]: append_list(2)
Out[81]: [1, 2]
# [解决方法] 初始化校验
In [82]: def append_list(ele, to=None):
    ...:     if to is None:
    ...:         to = []
    ...:     to.append(ele)
    ...:     return to
    ...:

In [83]: append_list(1)
Out[83]: [1]

In [84]: append_list(2)
Out[84]: [2]
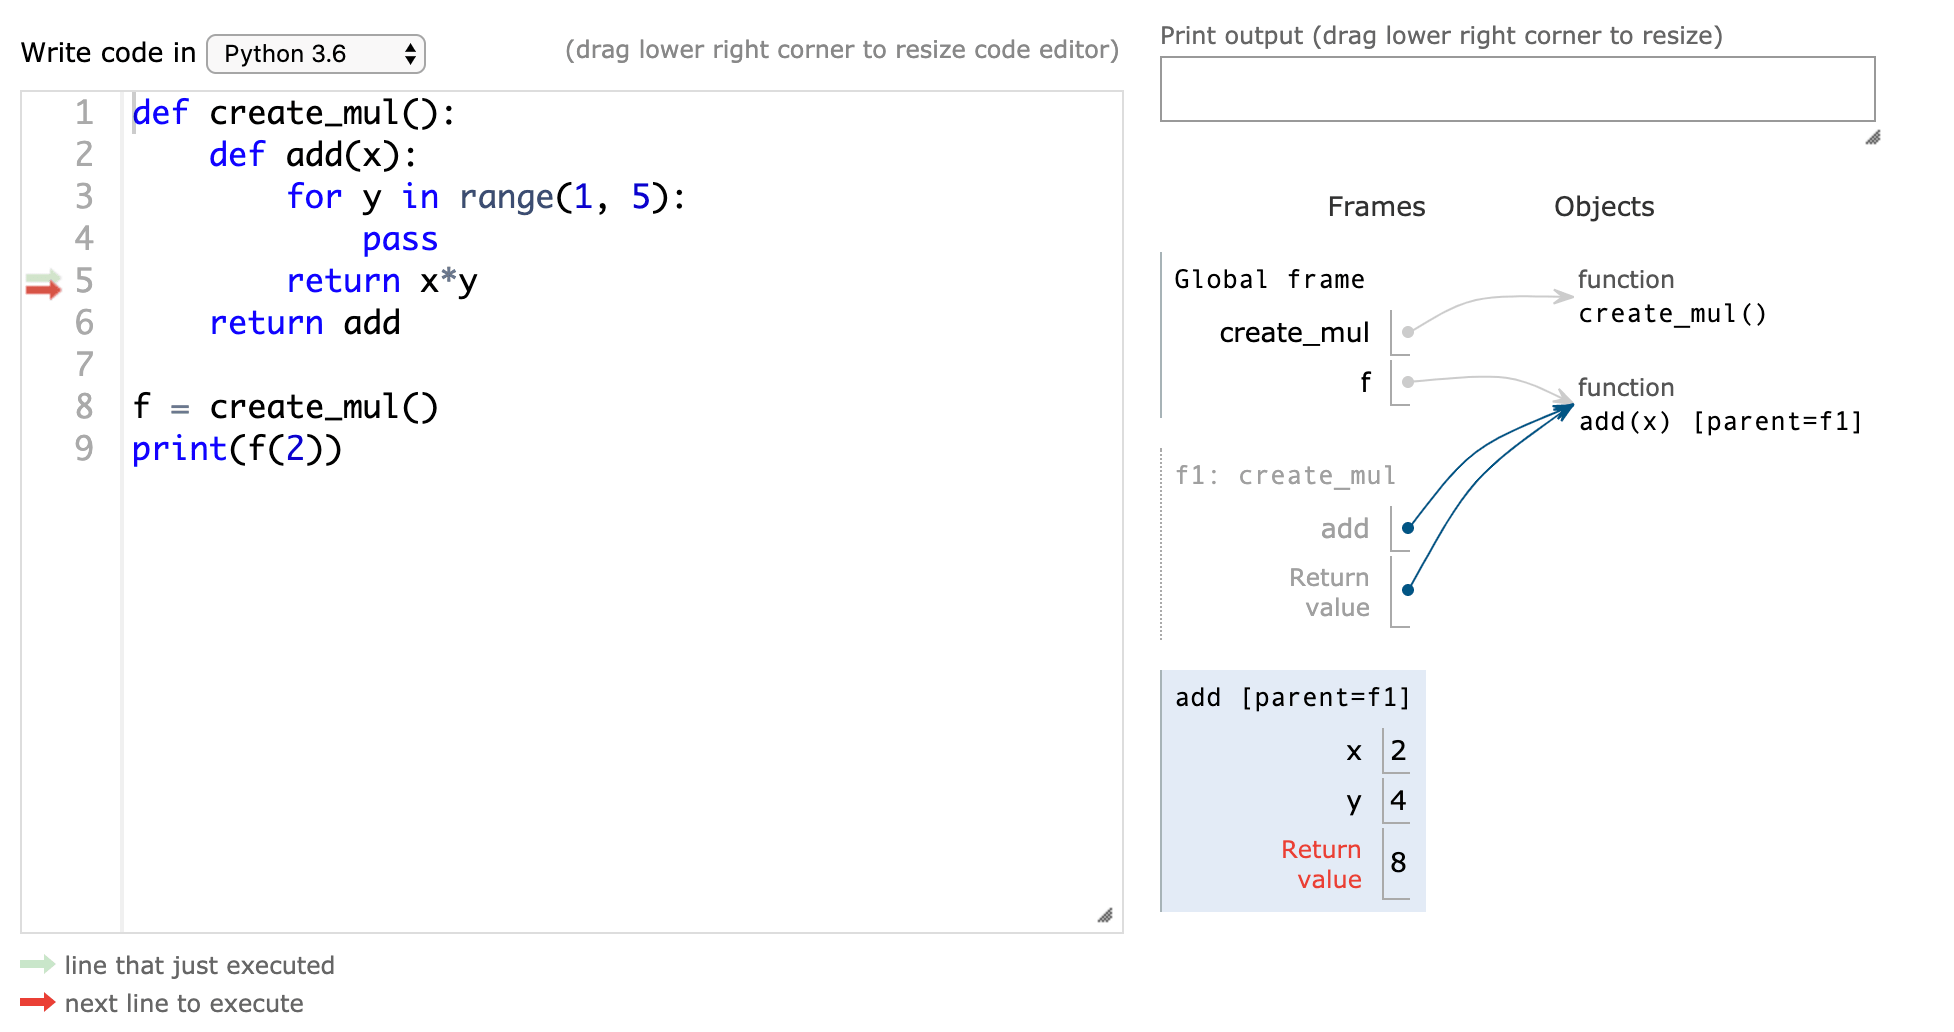
- 开发陷阱:延迟绑定特性
- 因为闭包中用到的值是在用到的时候调用查询得到的,也就是延迟绑定,所以
i在range(5)的时候被绑定为4,所以之后的值都是在4基础上计算而来的
- 因为闭包中用到的值是在用到的时候调用查询得到的,也就是延迟绑定,所以
# [开发陷阱]
In [85]: def create_mul():
    ...:     return [lambda x: x * i for i in range(5)]
    ...:

In [86]: for mul in create_mul():
    ...:     print(mul(2))
    ...:
8
8
8
8
8
# [解决方法] 函数默认值
In [87]: def create_mul():
    ...:     return [lambda x, i=i: x * i for i in range(5)]
    ...:

# [解决方法] 偏函数绑定
In [88]: from functools import partial
In [89]: from operator import mul

In [90]: def create_mul():
    ...:     return [partial(mul, i) for i in range(5)]
2. 模块
模块是一个一个的
Python文件,它将程序代码和数据封装起来,可以让项目组织清晰明了,更好维护。
2.1 模块中的导入方式
- 导入模块:import …
In : import my_module

In : my_module.A
Out: 100

In : my_module.add(1, 2)
Out: 3
- 导入模块:from … import …
# 不建议使用[from ... import *]的用法
# 1. 不好跟踪定位问题
# 2. 导入的变量没有被用到
# 3. 污染命名空间
In : from my_module import A, add

In : A
Out: 100

In : add(1, 2)
Out: 3
2.2 模块中的导入原理
- 第一次导入模块步骤:之后直接从内存加载
- [1] 搜集并找到对应模块文件
- [2] 在必要时把模块文件编译成字节码
- [3] 执行模块的代码来创建所定义的对象
- 搜索路径顺序
- [1] 程序的主目录
- [2]
PYTHONPATH系统变量 - [3] 标准库目录
- [4]
.pth文件
- 搜索文件类型
- [1]
a.py代码源文件 - [2]
a.pyc字节码文件 - [3] 目录
a作为包导入 - [4]
s.so、a.dll、a.pyd编译扩展文件 - [5] 用
c编译好的内置模块 - [6]
zip文件包
- [1]
# 搜索路径都汇总在sys.path变量里面
# 可以通过对sys.path的操作达到我们需要的效果
In [1]: import sys

In [2]: sys.path
Out[2]:
['',
 '/usr/local/bin',
 '/usr/local/Cellar/python/3.6.4_4/Frameworks/Python.framework/Versions/3.6/lib/python36.zip',
 '/usr/local/Cellar/python/3.6.4_4/Frameworks/Python.framework/Versions/3.6/lib/python3.6',
 '/usr/local/Cellar/python/3.6.4_4/Frameworks/Python.framework/Versions/3.6/lib/python3.6/lib-dynload',
 '/usr/local/lib/python3.6/site-packages',
 '/usr/local/lib/python3.6/site-packages/IPython/extensions',
 '/Users/escape/.ipython']
- 生成的字节码
# Python3中的字节码会保存在__pycache__的目录下面
In : !tree
.
├── __pycache__
│    └── my_module.cpython-36.pyc
└── my_module.py

1 directory, 2 files
__name__和__main__
def run():
    print('Run')

if __name__ == '__main__':
    run()
2.3 模块中的模块包
# 注意模块包导入的时候需要在目录下面添加__init__.py文件
In : !tree
.
├── dir1
│    ├── __init__.py
│    ├──a.py
│    └── dir2
│          ├── __init__.py
│          └──b.py
In : import dir1

In : dir1
Out: <module'dir1'from'dir1/__init__.py'>

In : import dir1.dir2
In : from dir1 import a
In : from dir1.dir2 import b

In : dir1.a
Out: <module'dir1.a'from'dir1/a.py'>

In : dir1.dir2.b
Out: <module'dir1.dir2.b'from'dir1/dir2/b.py'>
2.4 模块导入异常问题
- 今天写代码的时候,发现怎么执行
config.py这个模块都会显示无法找到'tool'这个模块,调试了好久,才发现还是自己没有搞明白Python的导入机制,导致了这个问题的出现,在此记录一下。
# 目录结构
├── main.py
└── tool
    ├── __init__.py
    ├── config.py
    └── test.py
# main.py
import tool.test

# config.py
debug = True

# test.py
print(__name__)

try:
    from . import config
    print(config.debug)
    del config
except ImportError:
    print('Relative import failed')

try:
    import config
    print(config.debug)
except ModuleNotFoundError:
    print('Absolute import failed')
- 目录结构以及对于代码内容,如上所示。我们分别通过两种形式进行执行和调用,来观察其对应的输出。
# Let's run test.py
$ python tool/test.py
__main__
Relative import failed
True
# Let's run main.py
$ python main.py
tool.test
True
Absolute import failed
通过上面的输出,我们可以很清楚的得知。
- test.py:直接运行
test.py文件后,__name__变量对于的输出是__main__,得知"test.py"文件之后其不知道其所属于那个包,所以在使用相对引用的时候就无法引入。然而使用import config是可以,这是因为在执行的时候tool目录被加到了sys.path环境变量中了,所以可以直接导入。 - main.py:直接运行
main.py文件后,__name__变量对于的输出是tool.test,得知tool目录在环境变量中了,所以可以直接导入。但是使用import config绝对导入就失败了,这是因为在Python3中不允许隐式的相对导入。
- test.py:直接运行
如果,我们直接使用
Python3的话,则可以不需要__init__.py文件了。