纸上得来终觉浅,绝知此事要躬行。

1. 面向对象的基础知识
Python 中一切皆对象
- 面向过程编程
- 可以使用在函数中调用其他函数的方式设计我们的程序,这叫做面向过程的编程。它的特点是把程序分成多个步骤,用函数把这些步骤一步一步实现,使用的时候串行依次调用。
- 面向对象编程
- 面向对象编程(
OOP)是一种程序设计思想,把对象作为程序的基本单元,一个对象可能是包含了数据、属性和操作数据的方法。
- 面向对象编程(
1.1 类和对象
编写较大程序的时候,使用面向对象的思路可以简化我们的代码。
基本概念
- 类:定义了一件事物的抽象特点
- 对象:是类的实例且一个类可以有多个对象
类的优势
- 继承(
inheritance):子类可以继承父类通用的属性和方法 - 封装(
Encapsulation):对外部隐藏有关对象工作原理的细节 - 多态(
polymorphism):同一个方法但可以产生不同的行为方式
- 继承(
# 这里的Subject就是类
class Subject:
    kind = None

    def __init__(self, nid, title):
        self.nid = nid
        self.title = title

    def show_title(self):
        return self.title

    def update_title(self, title):
        self.title = title

# 这里的newSubject就是对象
newSubject = Subject(1001, '条目一')
1.2 属性和方法
对象 = 属性 + 方法
- 属性(
attribute)- 对象可以使用属于它的普通变量来存储数据,这种从属于对象或类的变量就是属性,它描述了对象的特征。
- 方法(
method)- 方法也就是类中的函数,能通过它对对象进行操作,方便我们处理和控制逻辑结构。
# 这里的kind就是对应的类属性
# 这里的nid和title就是对应的对象属性
# 这里的show_title和update_title就是对应的实例方法
class Subject:
    kind = None

    def __init__(self, nid, title):
        self.nid = nid
        self.title = title

    def show_title(self):
        return self.title

    def update_title(self, title):
        self.title = title
1.3 类的使用
- 调用类的属性和方法
# 其中self表示实例本身,可以有其他替换,但不建议这样使用
class Subject:
    kind = None

    def __init__(self, nid, title):
        self.nid = nid
        self.title = title

    def show_title(self):
        return self.title

    def update_title(self, title):
        self.title = title
In [1]: from object import Subject

# 实例化,且subject这个变量被赋值为一个对象
In [2]: subject = Subject(1001, '条目一')

# 获得对象属性,也就是对象的特征
In [3]: subject.kind, subject.nid, subject.title
Out[3]: (None, 1001, '条目一')

# 调用对象方法
In [4]: subject.show_title()
Out[4]: '条目一'

# 方法内会更新对象属性
In [5]: subject.update_title('条目二')

In [6]: subject.show_title()
Out[6]: '条目二'
- 类.方法(对象) == 对象.方法()
# 以下两者等价且自动转化为下面的格式
In [7]: subject.show_title()
In [8]: Subject.show_title(subject)

# 以下两者等价且自动转化为下面的格式
In [9]: subject.update_title('条目三')
In [10]: Subject.update_title(subject, '条目三')
2. 面向对象的三大特性
2.1 继承
子类可以继承父类通用的属性和方法
【1】经典类和新式类的区别
- 继承搜索顺序
- 新式类的基类搜索顺序
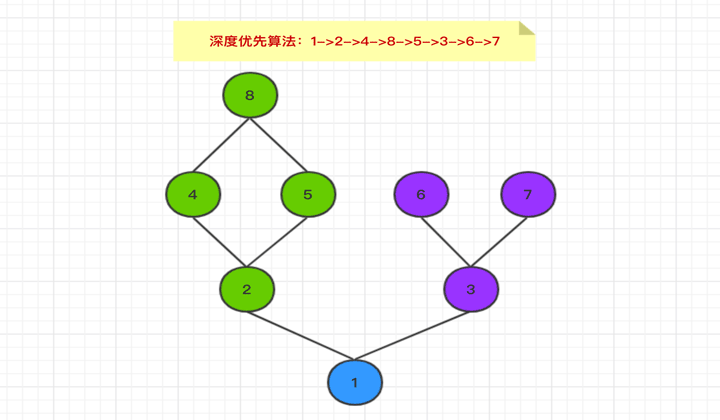
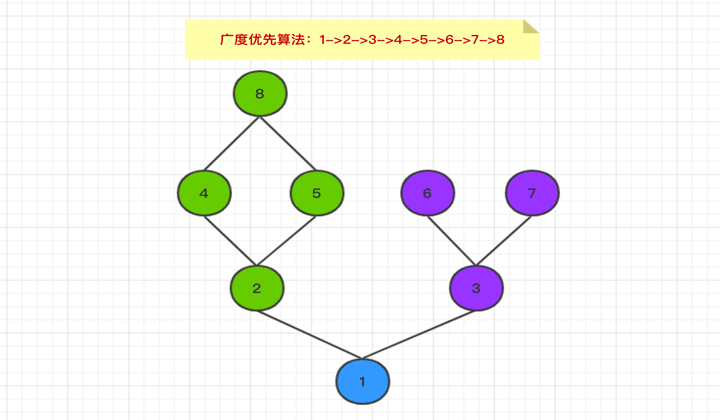
MRO采用C3广度优先算法,经典类采用DFS深度优先算法,所以在多重继承中搜索结果可能会有所不同。
- 新式类的基类搜索顺序
- 类和类型合并
- 新式类统一了类
class和类型type。
- 新式类统一了类
- 新的高级工具
- 新式类有更多的高级工具,如
slot、特性、描述符等。
- 新式类有更多的高级工具,如
# 经典类(只Python2中出现)
class Subject:
    pass

# Python2中的新式类定义
class Subject(object):
    pass

# Python3中只有新式类
class Subject:
    pass
【2】类方法的覆盖(override)
- 如果从父类继承的方法不能满足子类的需求,可以对其进行改写,这个过程叫方法的覆盖,也称为方法的重写。在子类定义父类同名方法之后,父类方法就被覆盖了。
- 注意我们这里使用
super函数来继承父类定义的变量,从而不用再一次次的对__init__的参数进行传递,方便操作和可视化。 - 父类私有的变量和方法,不会被子类继承以及覆盖,公有属性则反之。
# Python3中super的使用方法
super().__init__(nid, title)

# Python2中super的使用方法
super(Movie, self).__init__(nid, title)

# 这里的__init__可以替换为父类其中的任意方法
super().open()
super(LockableDoor, self).open()
# Movie类继承自Subject,为其子类并覆盖了show_title方法
class Subject:
    kind = None

    def __init__(self, nid, title):
        self.nid = nid
        self.title = title

    def show_title(self):
        return self.title

    def update_title(self, title):
        self.title = title


class Movie(Subject):
    kind = 'movie'

    def __init__(self, nid, title, directors=[]):
        super().__init__(nid, title)
        self.directors = directors

    def show_directors(self):
        return self.directors

    def show_title(self):
        return f'Movie: {self.title}'
【3】方法解析顺序(MRO)
- 继承和覆盖就会产生一个问题,那就是子类继承的是哪个父类定义函数就很难知道了,尤其再多继承当中尤为明显。
- 在
Python2.2之前的版本,继承顺序都是用的是DFS深度优先算法,之后的版本则都默认都使用C3广度优先算法。 - 深度优先会导致,我们子类的方法返回基类的方法,但往往基类中有没有什么内容或不是我们想要的内容,所以广度优先更为实用。
# 初始类继承代码
class A:
    def run(self):
        print(f'A.run')

class B:
    pass

class C:
    def run(self):
        print(f'C.run')

class D(B, C):
    pass
# 深度优先算法(D -> B -> C -> A)
In [13]: import inspect

In [14]: inspect.getmro(D)
Out[14]: (__main__.D, __main__.B, __main__.C, object)

In [15]: d = D()

In [16]: d.run()
C.run
# 广度优先算法(D -> B -> A -> C)
In [13]: import inspect

# 等价于D.__mro__效果
In [14]: inspect.getmro(D)
Out[14]: (classic_mro.D, classic_mro.B, classic_mro.A, classic_mro.C)

In [15]: d = D()

In [16]: d.run()
A.run
2.2 封装
对外部隐藏有关对象工作原理的细节
私有变量和方法
- 变量和方法以双下划线开始而不以双下划线结尾的表示私有,不能被外部访问。
- 私有变量和方法只在类内部可以访问,但是在
Python中并没有正在意义上的私有,可以通过其他方式间接调用到。
类变量
- 类变量在实例创建的时候相当于一份拷贝。
- 在
Python中所有的赋值操作都是浅拷贝,创建一个新的变量。 - 类变量可以直接访问,而且可以通过类进行变量的修改,并会影响所有实例。
# 变量和方法以双下划线开始表示私有变量,不能被外部访问
class Book:
    _kind = 'book'

    def __init__(self, name):
        self.__name = name

    def get_name(self):
        return self.__name

    def __print(self, str):
        self.__name = str + ' ' + self.__name

    def __print_hello(self):
        return self.__print('Hello')
In [1]: newbook = Book('spring')

In [2]: newbook._kind
Out[2]: 'book'

In [3]: Book._kind
Out[3]: 'book'

In [4]: newbook.get_name()
Out[4]: 'spring'

In [5]: Book.get_name(newbook)
Out[5]: 'spring'

In [6]: newbook.__print_hello()
---------------------------------------------------------------------------
AttributeError                            Traceback (most recent call last)
<ipython-input-8-ecf4d2790811> in <module>()
----> 1 book.__print_hello('spring')

AttributeError: 'Book' object has no attribute '__print_hello'

In [7]: newbook._Book__name
Out[7]: 'spring'

In [8]: newbook._Book__print_hello()
Out[8]: 'Hello'
- 封装实例说明
In [1]: class Door:
   ...:     def __init__(self, number, status):
   ...:         self.number = number
   ...:         self.status = status
   ...:
   ...:     def open(self):
   ...:         self.status = 'opening'
   ...:
   ...:     def close(self):
   ...:         self.status = 'closed'
   ...:

In [2]: door_1 = Door(1, 'closed')
2.3 多态
由继承而产生的相关但不同的类,其对象对同一消息会做出不同的响应
- 这里
show_title方法就是多态最好的体现,同一个函数名有不同意思。
class Subject:
    def __init__(self, nid, title):
        self.nid = nid
        self.title = title

    def show_title(self):
        return self.title


class Movie(Subject):
    def __init__(self, nid, title, directors=[]):
        super().__init__(nid, title)
        self.directors = directors

    def show_title(self):
        return f'Movie: {self.title}'
3. 面向对象的高级特性
3.1 property 属性
property也是一种高级的特性,其作用是在不改变方法的情况下,将方法改为只读的属性。同时,提供了存取setter、删除deleter的方法以供使用。
特性的优点
- 可控性
- 对属性有足够的可控性,如验证输入的合法性等操作。
- 安全性
- 属性虽然暴露了,但只设置
property的方法属性是改变不了的。如果尝试对其进行设置或删除,则系统会报错的。
- 属性虽然暴露了,但只设置
- 调用方法
- 装饰器
@property是为了在调用的时候不使用book.show_title(),而使用类似book.show_title这样的调用方式,当做属性值。
- 装饰器
官方文档说明
class property(object)
 |  property(fget=None, fset=None, fdel=None, doc=None) -> property attribute
 |
 |  fget is a function to be used for getting an attribute value, and likewise
 |  fset is a function for setting, and fdel a function for del'ing, an
 |  attribute.  Typical use is to define a managed attribute x:
 |  class C(object):
 |      def getx(self): return self._x
 |      def setx(self, value): self._x = value
 |      def delx(self): del self._x
 |      x = property(getx, setx, delx, "I'm the 'x' property.")
 |
 |  Decorators make defining new properties or modifying existing ones easy:
 |  class C(object):
 |      @property
 |      def x(self): return self._x
 |      @x.setter
 |      def x(self, value): self._x = value
 |      @x.deleter
 |      def x(self): del self._x
代码示例说明
- 这里我们先定义初始类继承代码,包括
Subject和Movie。 - 需要注意的是,这里有一个大坑。那就是在使用第一种用
property()函数的装饰器时,函数内的返回值必须使用私有变量表示,如_directors或__directors。
# 初始类继承代码
class Subject:
    kind = None

    def __init__(self, nid, title):
        self.nid = nid
        self.title = title

    def show_title(self):
        return self.title

    def update_title(self, title):
        self.title = title


class Movie(Subject):
    kind = 'movie'

    def __init__(self, nid, title, directors=[]):
        super().__init__(nid, title)
        self._directors = directors

    @property
    def directors(self):
        return self._directors
- 这里没有定义
setter和deleter方法,所以对directors属性的赋值和删除都是不被允许的。
In [1]: from object import Subject, Movie

In [2]: movie = Movie(2001, '美好的一天', ['Lucy'])

In [3]: movie.nid, movie.title, movie._directors
Out[3]: (2001, '美好的一天', ['Lucy'])

In [4]: movie.directors
Out[4]: ['Lucy']

# 没有定义setter方法导致无法修改属性
In [5]: movie.directors = ['Bob']
---------------------------------------------------------------------------
AttributeError                            Traceback (most recent call last)
<ipython-input-5-d0fe595015d6> in <module>()
----> 1 movie.show_directors = ['Bob']

AttributeError: can't set attribute

# 没有定义deleter方法导致无法删除属性
In [6]: del movie.directors
---------------------------------------------------------------------------
AttributeError                            Traceback (most recent call last)
<ipython-input-6-fef8c7cda0fd> in <module>()
----> 1 del movie.show_directors

AttributeError: can't delete attribute
- 修改
Moive类中的代码,将setter和deleter方法添加进来就可以进行删除和赋值了。注意,这里我们在赋值的时候进行了值的校验。
class Movie(Subject):
    kind = 'movie'

    def __init__(self, nid, title, directors=[]):
        super().__init__(nid, title)
        self._directors = directors

    @property
    def directors(self):
        return self._directors

    @directors.setter
    def directors(self, value):
        if not isinstance(value, list):
            raise ValueError('Invilid type')
        self._directors = value

    @directors.deleter
    def directors(self):
        print('Del directors is done.')
In [1]: from object import Subject, Movie

In [2]: movie = Movie(2001, '美好的一天', ['Lucy'])

In [3]: movie.directors
Out[3]: ['Lucy']

In [4]: movie.directors = 'Bob'
---------------------------------------------------------------------------
ValueError                                Traceback (most recent call last)
<ipython-input-4-948f0b1d06ce> in <module>()
----> 1 movie.directors = 'Bob'

~/Escape/MorePractise/object.py in directors(self, value)
     27     def directors(self, value):
     28         if not isinstance(value, list):
---> 29             raise ValueError('Invilid type')
     30         self._directors = value
     31

ValueError: Invilid type

In [5]: movie.directors = ['Bob']

In [6]: del movie.directors
Del directors is done.
- 这里
property也可以使用如下这种方式使用,可以达到同样的效果。其实property包含四个方法,包括获取、设置、删除和文档,第一个必选项。如果对应的方法没有,可以使用None来补位。
class Movie(Subject):
    kind = 'movie'

    def __init__(self, nid, title, directors=[]):
        super().__init__(nid, title)
        self._directors = directors

    def get_directors(self):
        return self._directors

    def set_directors(self, value):
        if not isinstance(value, list):
            raise ValueError('Invilid type')
        self._directors = value

    def del_directors(self):
        print('Del directors is done.')

    directors = property(get_directors, set_directors, del_directors)
3.2 monkey path
用来在运行时动态修改已有的代码,而不需要修改原始代码
含义解释
Monkey patch就是在运行时对已有的代码进行修改,达到hot patch的目的。Eventlet中大量使用了该技巧,以替换标准库中的组件,比如socket等。
原因说明
- 由于
Python中的名字空间是开放,是通过dict来实现,所以很容易就可以达到patch的目的。 - 名字空间包含
locals、globals、builtin,其中定义在函数内声明的变量属于locals,而模块内定义的函数属于globals。
代码演示
- 简单的示例说明
In [1]: class Door:
   ...:     def __init__(self, number, status):
   ...:         self.number = number
   ...:         self.status = status
   ...:
   ...:     def open(self):
   ...:         self.status = 'opening'
   ...:
   ...:     def close(self):
   ...:         self.status = 'closed'
   ...:

In [2]: door = Door(1, 'closed')

# 注意这里初始化之后,在进行改写才能生效
In [3]: Door.open = lambda self: print('Hi, girl')

In [4]: door.open()
Out[4]: 'Hi, girl'
- 深入理解热更新机制
# 我们先来看一下eventlet中的Patcher的调用代码
# 对标准的ftplib做monkey patch,将eventlet的GreenSocket替换标准的socket
# inject函数会将eventlet的socket模块注入标准的ftplib中,globals dict被传入以做适当的修改

from eventlet import patcher
from eventlet.green import socket

patcher.inject('ftplib', globals(), ('socket', socket))
del patcher
# inject的实现

__exclude = set(('__builtins__', '__file__', '__name__'))

def inject(module_name, new_globals, *additional_modules):
    if not additional_modules:
        # supply some defaults
        additional_modules = (
            _green_os_modules() +
            _green_select_modules() +
            _green_socket_modules() +
            _green_thread_modules() +
            _green_time_modules())

    ## Put the specified modules in sys.modules for the duration of the import
    saved = {}
    for name, mod in additional_modules:
        saved[name] = sys.modules.get(name, None)
        sys.modules[name] = mod

    ## Remove the old module from sys.modules and reimport it while
    ## the specified modules are in place
    old_module = sys.modules.pop(module_name, None)
    try:
        module = __import__(module_name, {}, {}, module_name.split('.')[:-1])

        if new_globals is not None:
            ## Update the given globals dictionary with everything from this new module
            for name in dir(module):
                if name not in __exclude:
                    new_globals[name] = getattr(module, name)

        ## Keep a reference to the new module to prevent it from dying
        sys.modules['__patched_module_' + module_name] = module
    finally:
        ## Put the original module back
        if old_module is not None:
            sys.modules[module_name] = old_module
        elif module_name in sys.modules:
            del sys.modules[module_name]

        ## Put all the saved modules back
        for name, mod in additional_modules:
            if saved[name] is not None:
                sys.modules[name] = saved[name]
            else:
                del sys.modules[name]

    return module
3.2 静态方法和类方法
当方法和类是有一定关系但是又不和类中的内容直接关联就应该用静态方法,不应该和当前类的类的变量、方法产生任何关系。
方法分类
- 对象方法
- 不带任何装饰器的普通函数,用于执行和对象相关的操作。
- 方法传入的第一个参数为对象
self。
- 类方法
- 使用
@classmethod装饰的函数,用于修改类属性相关的操作。 - 方法传入的第一个参数为类
cls。
- 使用
- 静态方法
- 使用
@staticmethod装饰的函数,用于执行和类相关的,但不要访问类本身逻辑关系。 - 方法直接传值,不需要出入对象和类。
- 使用
示例说明
- 这里我们先定义初始类继承代码
class A:
    count = 0

    def inc_count1(self):
        self.count += 1

    @classmethod
    def inc_count2(cls):
        cls.count += 1

    @staticmethod
    def inc_count3():
        A.count += 1

    @staticmethod
    def avg(*items):
        return sum(items) / len(items)
- 执行实例方法发现,只改变了实例变量的值,类变量并没有发生改变。
In [1]: from func import A

In [2]: a = A()

In [3]: a.count, A.count
Out[3]: (0, 0)

# 等价于A.inc_count1(a)的效果
In [4]: a.inc_count1()

In [5]: a.count, A.count
Out[5]: (1, 0)
- 但当执行类方法发现,实例变量和类变量都发生了变化。
In [7]: a = A()

In [8]: a.count, A.count
Out[8]: (0, 0)

In [9]: a.inc_count2()

In [10]: a.count, A.count
Out[10]: (1, 1)
- 同样执行静态方法发现,只影响了类变量的值。但是我们这样使用静态方法是不合适的,因为静态方法最好不要访问类本身逻辑关系。
In [1]: from func import A

In [2]: a = A()

In [3]: a.count, A.count
Out[3]: (0, 0)

# 需要绑定对象到self上
In [4]: A.inc_count1(a)

# 对象方法依然不影响类变量的值
In [5]: a.count, A.count
Out[5]: (1, 0)

In [6]: A.inc_count3()

In [7]: a.count, A.count
Out[7]: (1, 1)

In [8]: A.inc_count3()

# 第二次调用类方法,只影响了类变量,但没有影响对象变量
In [9]: a.count, A.count
Out[9]: (1, 2)
总结小计
- 对象方法(
inc_count1)只影响对象的变量,而无法影响类变量。而类方法(inc_count2)当做对象方法,会影响对象变量和类变量,否则(inc_count3)只影响类变量。 - 静态方法和类方法都访问不到对象变量,因为没有
self。静态方法也访问不到cls,只能把类名写进去才能访问。incr_count3方法事实上这样用已经违背了静态方法不能访问类本身的原则,要访问当前类就应该用类方法,avg才是一个正确静态方法用法标准示例,其方法内的逻辑和类A完全无关。 Python设计了静态方法,但静态方法应用场景非常有限罢了。可能很多开发者都没写过静态方法,或者写也本来是应该用类方法才对。放到类中作为静态方法,通常是大型项目中,模块和函数太多且怕这些函数放在外面被用混了,放在类里面别人就不能乱用,而且一眼看去就能看到类和这个函数的关系。