Installation is not easy, and Ann and cherish!
The Nvidia CUDA toolkit is an extension of GPU parallel computing platform and programming model. The Nvidia CUDA installation consists of inclusion of the official Nvidia CUDA repository followed by the installation of relevant meta package.
NVIDIA驱动(无则没发工作)
    └── 提供基础硬件接口,供CUDA-Toolkit和NVIDIA-SMI使用
        ├── CUDA Toolkit(并行计算框架)
        │     ├── 提供软件开发工具包(如nvcc等)
        │     └── 提供运行时库和高性能计算库
        │
        ├── cuDNN(依赖CUDA-Toolkit)
        │     └── 提供用于深度神经网络的GPU加速库
        │     └── 被深度学习框架(TensorFlow/PyTorch)广泛使用
        │
        └── NVIDIA-SMI
              └── 提供GPU硬件监控和管理功能
1. Software Requirements and Conventions Used
Software requirements and linux command line conventions.
| Category | Requirements, Conventions or Software Version Used |
|---|---|
| System | CentOS 7.5 or higher |
| Software | Existing Nvidia Driver installation on CentOS 7 |
| Other | Privileged access to your Linux system as root or via the sudo command. |
| Conventions | # - requires given linux commands to be executed with root privileges either directly as a root user or by use of sudo command; $ - requires given linux commands to be executed as a regular non-privileged user |
2. CentOS 7 Linux install NVIDIA CUDA Toolkit
How to install NVIDIA CUDA Toolkit on CentOS 7 Linux step by step instructions.
Step1 Download the latest Nvidia CUDA repository package cuda-repo-rhel7-*.rpm. For example use the wget command to download the latest CUDA package which is at the time of writing the CUDA version 10:
# download
$ wget https://developer.download.nvidia.com/compute/cuda/repos/rhel7/x86_64/cuda-repo-rhel7-10.0.130-1.x86_64.rpm
The package should now be available within your home directory:
# check
$ ls cuda-repo-rhel7-10.0.130-1.x86_64.rpm
cuda-repo-rhel7-10.0.130-1.x86_64.rpm
Step2 Install the CUDA repository package. This will enable CUDA repository on your CentOS 7 Linux system:
# install
$ sudo rpm -i cuda-repo-*.rpm
Step3 Select CUDA meta package you wish to install based on the below table. For example the below command will install the entire CUDA toolkit and driver packages:
# install
$ sudo yum install cuda
Example of Meta Packages Available for CUDA 10.0. Reference: NVIDIA.com
| Package name | Description |
|---|---|
| cuda | Installs all CUDA Toolkit and Driver packages. Handles upgrading to the next version of the cuda package when it’s released. |
| cuda-10.0 | Installs all CUDA Toolkit and Driver packages. Remains at version 10.0 until an additional version of CUDA is installed. |
| cuda-toolkit-10.0 | Installs all CUDA Toolkit packages required to develop CUDA applications. Does not include the driver. |
| cuda-tools-10.0 | Installs all CUDA command line and visual tools. |
| cuda-runtime-10.0 | Installs all CUDA Toolkit packages required to run CUDA applications, as well as the Driver packages. |
| cuda-compiler-10.0 | Installs all CUDA compiler packages. |
| cuda-libraries-10.0 | Installs all runtime CUDA Library packages. |
| cuda-libraries-dev-10.0 | Installs all development CUDA Library packages. |
| cuda-drivers | Installs all Driver packages. Handles upgrading to the next version of the Driver packages when they’re released. |
Step4 Export system path to Nvidia CUDA binary executables. Open the ~/.bashrc using your preferred text editor and add the following two lines:
export PATH=/usr/local/cuda/bin:$PATH
export LD_LIBRARY_PATH=/usr/local/cuda/lib64:$LD_LIBRARY_PATH
Step5 Re-login or read your updated ~/.bashrc file:
# reload
$ source ~/.bashrc
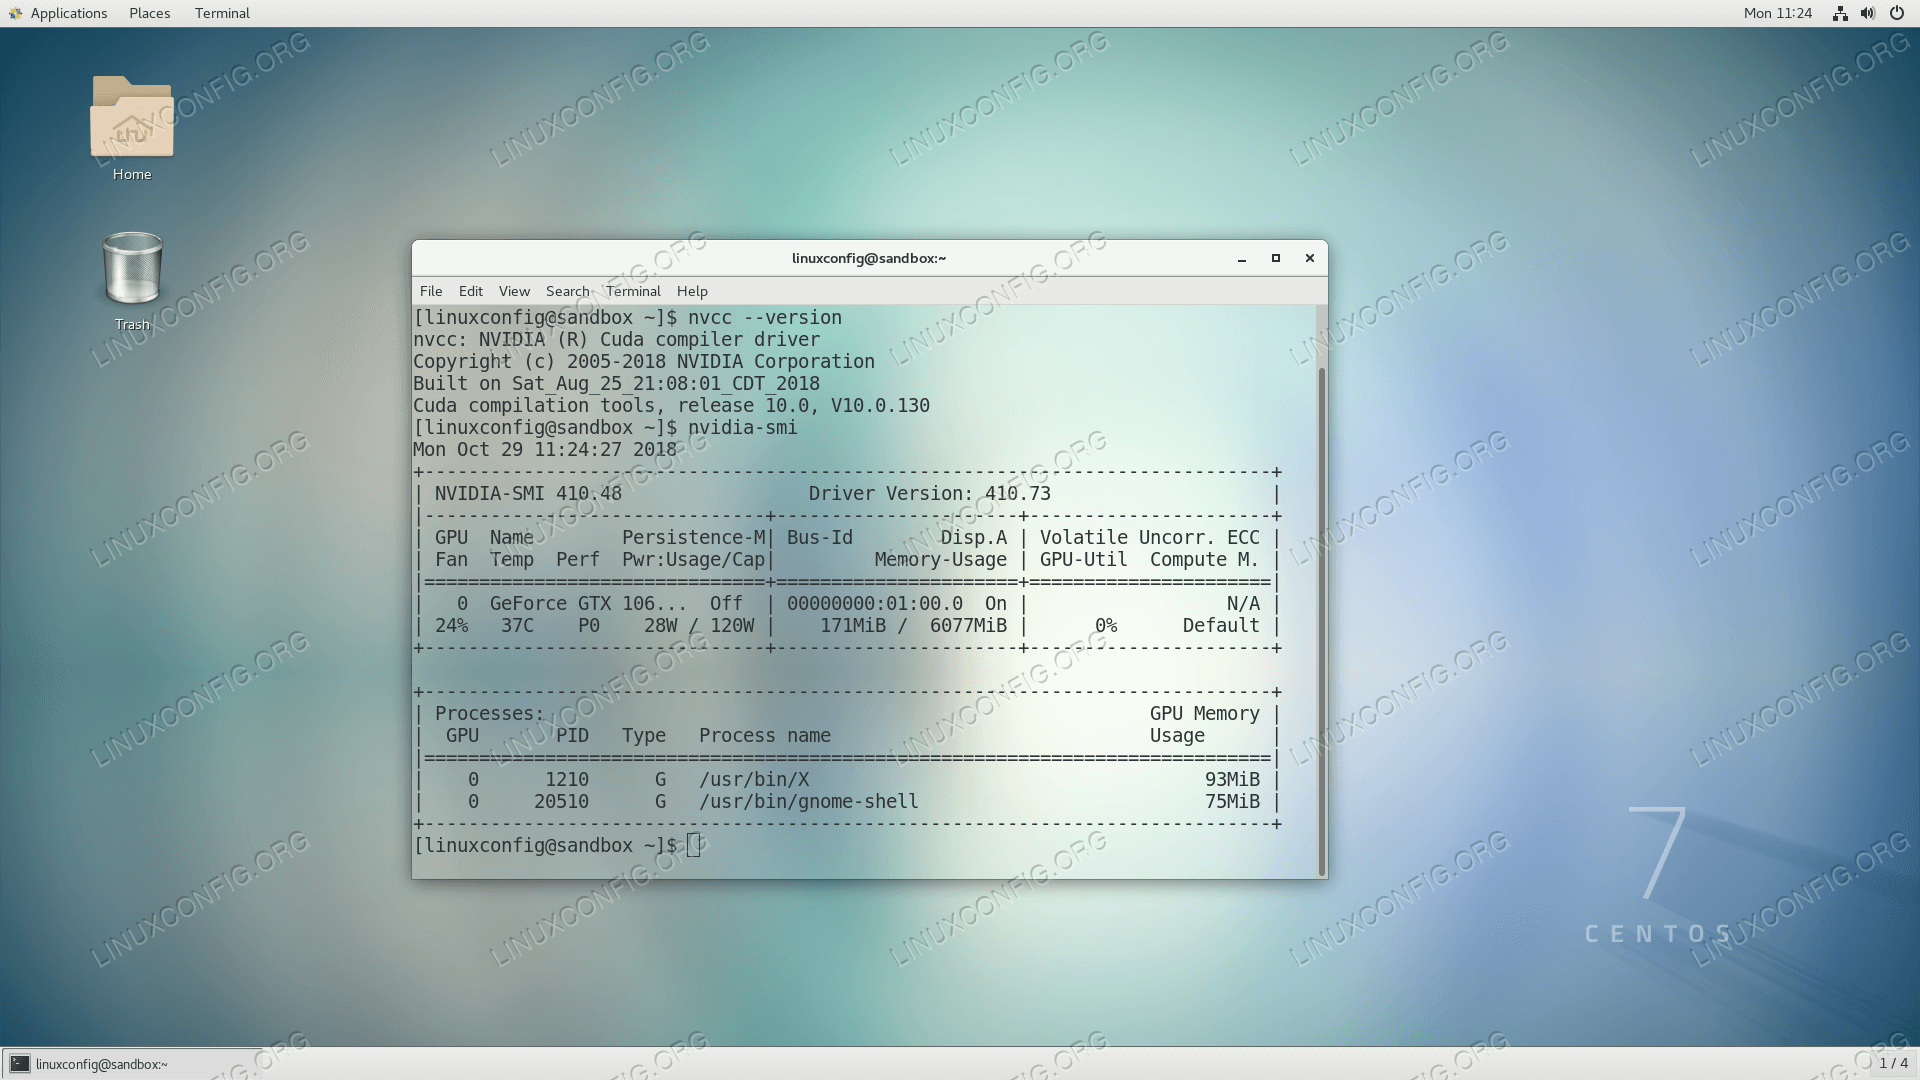
Step6 Confirm the correct CUDA installation:
# check
$ nvcc --version
$ nvidia-smi
Step7 Perform further tests by compiling your first CUDA program:
# test
$ mkdir cuda-samples
$ cuda-install-samples-10.0.sh cuda-samples/
$ cd cuda-samples/NVIDIA_CUDA-10.0_Samples/0_Simple/clock
$ make